In our previous articles in the android development section, we have covered how to download and install android studio in windows and also discussed how to create and install your first android application on a real device.
Having known that, we shall highlight on how to convert a website application to an android app that you can install on your phone, share with other people and even host in google play store.
You may have noticed android apps that are exactly similar to their corresponding websites, the concept used here is that you may not have an intention of redoing the whole website by developing an app for it due to time factor and budget costs and this may trigger you to just come up with a simple application that can act as a prototype before the main app is developed.
A web view is a component in the android system that allows android apps to display webpage contents inside an application. With the use of internet permissions, the content of the webpage is viewed without displaying the URL as it fetches and displays without typing it.
How to convert a web application to an android application using webview
To begin with,
Ensure you have a working website link, in this case, we shall use, https://www.solutionspacenet.com
Open android studio and create a new project (refer to this link on how to create and set up your environment for your first app), in my case I will name it as SolutionSpaceApp
After setting up the environment,
Select the activity_main.xml tab and add the following inside the layout tags
<WebView
        android:id="@+id/webView"
        android:layout_width="fill_parent"
        android:layout_height="fill_parent"
        tools:ignore="MissingConstraints" />
So the full activity_main.xml code will be as below
<?xml version="1.0" encoding="utf-8"?>
<androidx.constraintlayout.widget.ConstraintLayout
 xmlns:android="http://schemas.android.com/apk/res/android"
    xmlns:app="http://schemas.android.com/apk/res-auto
    xmlns:tools="http://schemas.android.com/tools"
    android:layout_width="match_parent"
    android:layout_height="match_parent"
    tools:context=".MainActivity">
    <WebView
        android:id="@+id/webView"
        android:layout_width="fill_parent"
        android:layout_height="fill_parent"
        tools:ignore="MissingConstraints" />
</androidx.constraintlayout.widget.ConstraintLayout>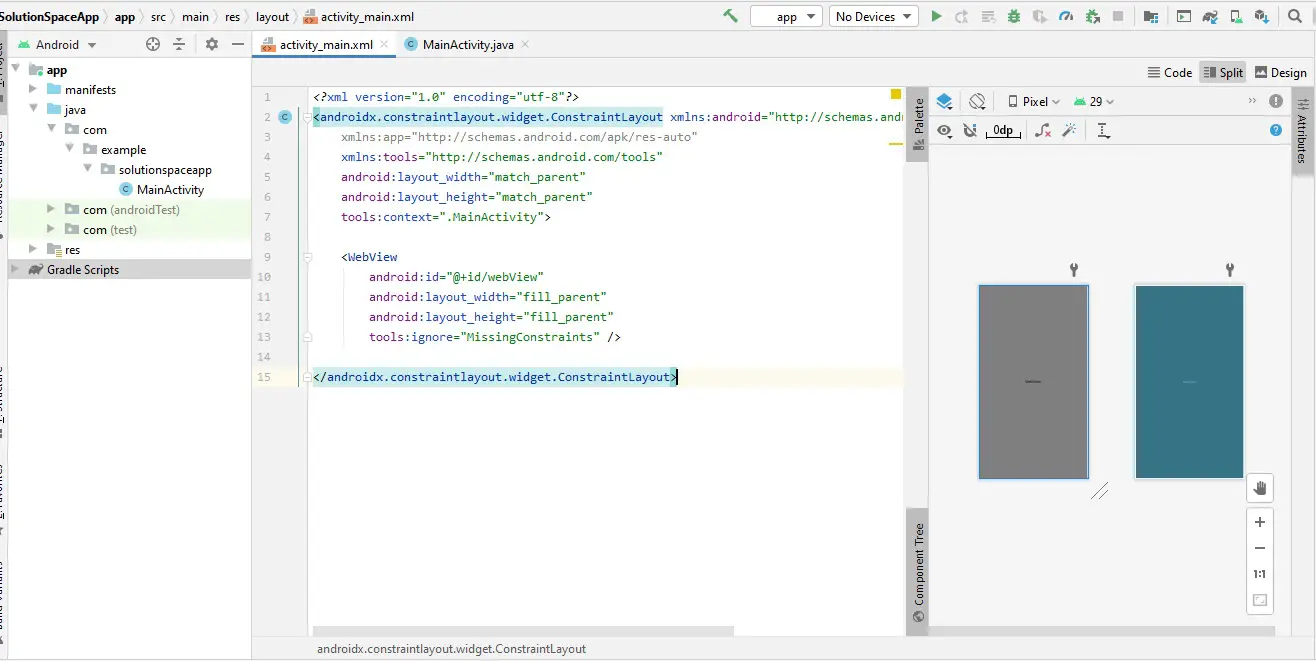
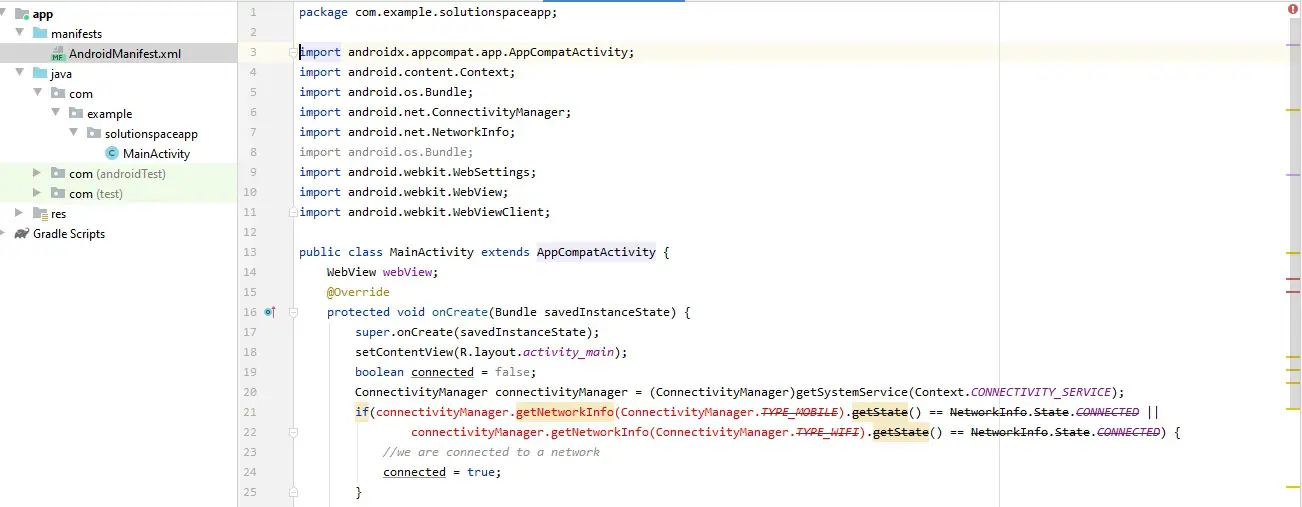
Switch to MainActivity.java tab and add the following
- Import these features
import android.net.NetworkInfo;
import android.os.Bundle;
import android.webkit.WebSettings;
import android.webkit.WebView;
import android.webkit.WebViewClient;
They allow your app to consume resources from those libraries without adding the content of the libraries in your app.
- Next, initialize WebView inside the public class
WebView webView;- Also add the code below in the OnCreate method
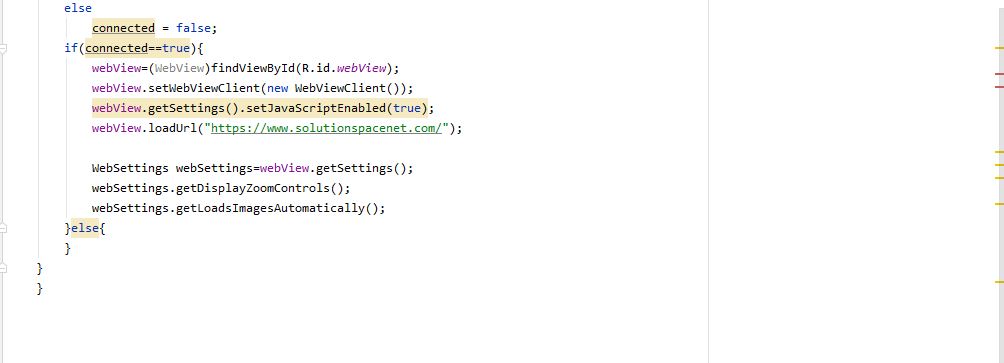
In the loadUrl method, add your website link
boolean connected = false;
        ConnectivityManager connectivityManager = (ConnectivityManager)getSystemService(Context.CONNECTIVITY_SERVICE);
        if(connectivityManager.getNetworkInfo(ConnectivityManager.TYPE_MOBILE).getState() == NetworkInfo.State.CONNECTED ||                connectivityManager.getNetworkInfo(ConnectivityManager.TYPE_WIFI).getState() == NetworkInfo.State.CONNECTED) {
            //we are connected to a network
            connected = true;
        }
        else
            connected = false;
        if(connected==true){
            webView=(WebView)findViewById(R.id.webView);
            webView.setWebViewClient(new WebViewClient());
            webView.getSettings().setJavaScriptEnabled(true);
            webView.loadUrl("https://www.solutionspacenet.com/");
            WebSettings webSettings=webView.getSettings();
            webSettings.getDisplayZoomControls();
            webSettings.getLoadsImagesAutomatically();
        }else{
                    }
}- The full code for MainActivity.java will be as follows
You will not that this file will contain errors but they will be fixed in our next step
- Next, open the AndroidManifest.xml file in the manifests folder
This is where we will add permissions for accessing the internet as below
<uses-permission android:name="android.permission.ACCESS_NETWORK_STATE" />
    <uses-permission android:name="android.permission.INTERNET" />
You will notice when you add the two lines of code in the manifest file, the errors in MainActivity.java will disappear, if they do not, click the Make project icon represented by a hammer to fix the project.
The full AndroidManifest code will be
<?xml version="1.0" encoding="utf-8"?>
<manifest xmlns:android="http://schemas.android.com/apk/res/android"    package="com.example.solutionspaceapp">
    <uses-permission android:name="android.permission.ACCESS_NETWORK_STATE" />
    <uses-permission android:name="android.permission.INTERNET" />
    <application
        android:allowBackup="true"
        android:icon="@mipmap/ic_launcher"
        android:label="@string/app_name"
        android:roundIcon="@mipmap/ic_launcher_round"
        android:supportsRtl="true"
        android:theme="@style/Theme.SolutionSpaceApp">
        <activity android:name=".MainActivity">
            <intent-filter>
                <action android:name="android.intent.action.MAIN" />
                <category android:name="android.intent.category.LAUNCHER" />
            </intent-filter>
        </activity>
    </application>
</manifest>
Having done that, the next step will be running your project having connected your phone through USB and your app will be installed on your phone