It is always known that the first impression that a user will have on a design will act as a determinant of the time that will take in a particular application, therefore it is always important to ensure that a user has a great experience while using an application.
An application design should follow the best practices that are set to ensure that the design is easy and simple to navigate with ease and also the layout is arranged in a way that it is directing the user from one step to another.
In android design, there is a design practice called material design that aims to achieve the best practice of user experience using minimal effort.
In this article, we shall discuss what material design in android is, why is material design recommended in android, how to implement or add material design in android, and finally show some examples of designing android user interfaces using material design.
What is Material Design in android?
According to the material design official documentation website https://material.io/design/introduction, material design is a uniform design system that is inspired by the physical world and the textures in it.
Material design was created by Google so that it can help developers to create quality design experiences that will render well in browsers or mobile devices.
Material designs aim to achieve the best user interface designs and therefore apply guidelines, components, and tools that are adjustable to come up with the best practices.
Why is material design recommended or used
Material design was developed with the mind of physical world items and their textures therefore it can consideration of what everyday users are in love with.
The material design applies the best principles that bring out the best user experiences and designs therefore it fits well in everyday usage.
Material design has readymade themes that are compatible with any application
Material design has widgets that support views that are considered complex by users.
Material design has ready APIs that help in implementing custom designs such as shadows and animations.
How to implement or add material design in android
In the android studio project, material design is treated as a dependency, therefore, is added in the Gradle.
To add material design dependency in android,
- Visit https://github.com/material-components/material-components-android/releases
- Check the latest version that is released
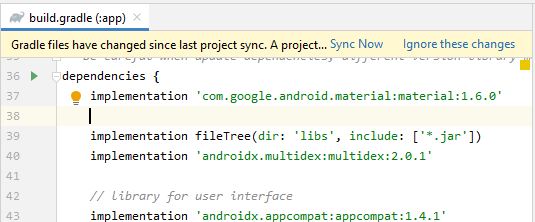
- Open build.gradle file for an app
- In the dependencies section, add this code snippet that has the latest version as shown below
// latest release is 1.6.0
implementation 'com.google.android.material:material:1.6.0'
- Click sync now and wait for Gradle build to finish
Once Gradle has built successfully, the material design will be ready for use in your android project.
How to use material design in android
Having added material design to your android project from the steps above, we now show how to use material design in a project in android.
For every object that uses material design in the design, that is, the XML file in android, it has to be surrounded by the <com.google.android.material> </com.google.android.material> tags which have to have the object that is defined, for example, edit text and buttons.
Material Design Example 1 (EditText)
To define an edit text that follows material design build system, you will need to have a define an example code shown below
First, add the textinput layout as shown
<com.google.android.material.textfield.TextInputLayout
android:id="@+id/edittext_lyt"
android:layout_width="match_parent"
android:layout_height="wrap_content">
</com.google.android.material.textfield.TextInputLayout>
Inside the text input layout, define the edit text as shown
<com.google.android.material.textfield.TextInputEditText
android:id="@+id/edit_text"
android:layout_width="match_parent"
android:layout_height="wrap_content" />
The full edit text with the material design is as shown below
<com.google.android.material.textfield.TextInputLayout
android:id="@+id/edittext_lyt"
android:layout_width="match_parent"
android:layout_height="wrap_content">
<com.google.android.material.textfield.TextInputEditText
android:id="@+id/edit_text"
android:layout_width="match_parent"
android:layout_height="wrap_content" />
</com.google.android.material.textfield.TextInputLayout>
The code above will produce an edit text that has material design included.
Note that you are not limited in adding other styles as you may prefer
Material Design Example 2 (Button)
There are different options in achieving material designs for buttons in android.
First, if material design is already added in the build.gradle file for app as we did above, some default styles will be imported automatically and therefore while you define the button element, it will pick the default styles as shown.
<Button
android:id="@+id/button"
android:layout_width="wrap_content"
android:layout_height="wrap_content"
android:text="Button 1"
/>
Secondly, if you are interested in advanced features that are offered by material design for example, radius and elevation, you will need to create a separate styles file and include it using the background or styles attribute.
<Button
android:id="@+id/button1"
android:layout_width="wrap_content"
android:layout_height="wrap_content"
android:text="Button 1"
style="?attr/materialButtonOutlinedStyle" // this style is defined in the styles.xml
/>
Styles file in the background attribute is as shown below
<Button
android:id="@+id/button1"
android:layout_width="wrap_content"
android:layout_height="wrap_content"
android:text="Button 1"
android:background="@drawable/style1" // this style is in the drawable folder and a file style1.xml
style="?attr/materialButtonOutlinedStyle"
/>
Conclusion
With the above discussion and illustrations using examples, you now understand what android material design is and how is it implemented in android studio, and how it is used in the design elements.
There is more to cover on material design but that’s it for this article. Follow for more.