The two files, that is, project Gradle and app Gradle are equally important since each has to do its role independently but they sometimes confuse the android developers while working with them.
The question android developers ask themselves is why must the two files be there for every single project yet they share the name and are placed next to each other.
In this article, we shall answer the question of why there must be two Gradle files for every android project, that is, project Gradle and app Gradle by discussing the role of each Gradle file and highlighting the major differences between project Gradle and app Gradle.
What is a gradle file in android
In our previous article, while discussing how to update a Gradle file in android, we defined a Gradle as a tool that is used to control the android development process from compiling, packaging to deployment is automated without the input of the user.
The Gradle in android is the one that facilitates the process of compiling the code written by the developer to a packaged file called apk (android package file) or an aab (android app bundle).
If the Gradle is not working in android studio, your project will not execute successfully and therefore you will not be able to test the product you are developing.
What is a project gradle and app gradle
Project Gradle is commonly written as build.gradle (Project: projectname) while the app Gradle is commonly written as build.gradle (Module: projectname)
Each project must have a project Gradle and an app Gradle.
Where to find project Gradle and app gradle
In the android studio, there are two ways in which you view the project Gradle and app Gradle. In one view, the project Gradle and the app Gradle are displayed next to each other while in the other view, they are displayed separately.
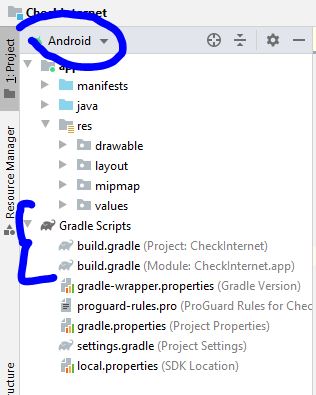
View 1
In the first view, ensure that the android view is selected at the top left of the android studio. All the Gradle files will be put together in a section called Gradle scripts
The project Gradle will be above the app Gradle as shown below
View 2
In the second view, select project at the top left and you will note that the layout will change.
At the top level, the build.gradle that will be visible is the project Gradle since we are in the view of the project
To view the app Gradle, you will need to expand the app section and the build.gradle for the app will be visible
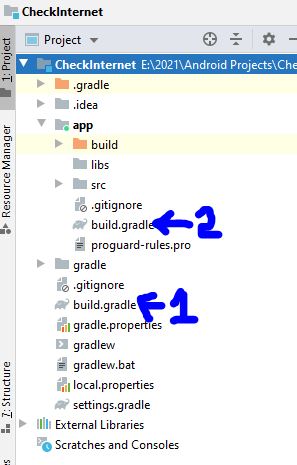
With this view of the project, you can easily tell the Gradle that you are working on without confusion.
Differences between project Gradle and app gradle
Having highlighted what each Gradle is and where to locate them in android studio, we need now to understand what really each Gradle does in an android project and which are the notable differences between each.
- The project Gradle acts as the root folder where the project settings are configured while the app Gradle acts as the file that controls the app settings in a project.
To understand better, a project can have more than one module that’s why a single app Gradle will only contain the specific settings associated with it.
- The project Gradle settings are applicable to every module in the project while the app Gradle settings are applicable to the app folder only.
For example, in the project Gradle, we define the tools version that will be applicable for the project but in the app Gradle, you can define different tools that will be used internally but overall in the project Gradle will be applicable.
- The app Gradle is responsible for defining the project id, the project version, the SDK version that are applicable for the app that is being built and not the project Gradle.
- External libraries, mostly known as dependencies that are added to allow the use of other features in the project are added in the app Gradle and not the project Gradle.
- The project gradle has limited features but the app gradle is not limited to growth as any new library can be included in the project.
Example of a project gradle
// Top-level build file where you can add configuration options common to all sub-projects/modules.
buildscript {
    ext.kotlin_version = "1.4.32"
    repositories {
        google()
        jcenter()
    }
    dependencies {
        classpath "com.android.tools.build:gradle:4.1.3"
        classpath "org.jetbrains.kotlin:kotlin-gradle-plugin:$kotlin_version"
        // NOTE: Do not place your application dependencies here; they belong
        // in the individual module build.gradle files
    }
}
allprojects {
    repositories {
        google()
        jcenter()
    }
}
task clean(type: Delete) {
    delete rootProject.buildDir
}
Example of app gradle
plugins {
    id 'com.android.application'
    id 'kotlin-android'
}
android {
    compileSdkVersion 30
    defaultConfig {
        applicationId "com.example.checkinternet"
        minSdkVersion 22
        targetSdkVersion 30
        versionCode 1
        versionName "1.0"
        testInstrumentationRunner "androidx.test.runner.AndroidJUnitRunner"
    }
    buildTypes {
        release {
            minifyEnabled false
            proguardFiles getDefaultProguardFile('proguard-android-optimize.txt'), 'proguard-rules.pro'
        }
    }
    compileOptions {
        sourceCompatibility JavaVersion.VERSION_1_8
        targetCompatibility JavaVersion.VERSION_1_8
    }
    kotlinOptions {
        jvmTarget = '1.8'
    }
}
dependencies {
    implementation "org.jetbrains.kotlin:kotlin-stdlib:$kotlin_version"
    implementation 'androidx.core:core-ktx:1.7.0'
    implementation 'androidx.appcompat:appcompat:1.3.1'
    implementation 'com.google.android.material:material:1.4.0'
    implementation 'androidx.constraintlayout:constraintlayout:2.1.1'
    implementation 'androidx.annotation:annotation:1.1.0'
    implementation 'androidx.lifecycle:lifecycle-livedata-ktx:2.4.0'
    implementation 'androidx.lifecycle:lifecycle-viewmodel-ktx:2.4.0'
    testImplementation 'junit:junit:4.+'
    androidTestImplementation 'androidx.test.ext:junit:1.1.3'
    androidTestImplementation 'androidx.test.espresso:espresso-core:3.4.0'
}
Conclusion
With the discussion above, I hope you can now tell the difference between project Gradle and app Gradle. Hope you will have a clear view of where to add each code depending on its use on the project.
The most important thing while working on the Gradle is to ensure that it is building successfully without which your app will not execute.
Thank you for following.