
Listviews are common in most of the apps we use for day-to-day activities. They help display data in a vertical form independent of the length of the data. Listviews are useful since they are scrollable by default which makes the work of the developer easier working with them
Examples of apps that use listviews are WhatsApp whereby the chats, statuses, contacts, and call logs all appear in a list. Another example is the contacts app which also displays your contacts in a list
Listview in android work with related elements or items grouped in an array
In this article, we shall focus on how to create a listview in android using kotlin, add data to the listview, show examples of how to initialize listview in android, and run the application to observe the listview functionality
Listviews work in any activity provided by the android studio but by default, we will create a project with empty activity so that we can demonstrate listview as an independent feature in android.
- First, you will need to create a new project which you can refer to our previous article how to create an app using kotlin
Once the project is created, you will be provided with two tabs namely activity_main.xml and MainActivity.kt
For this article, we will demonstrate how to display the common car types in a listview
Listview is defined in the main XML file as an independent element, therefore, open the activity_main.xml and add the list view element as follows.
Remember to assign it an id which will identify it in the functionality module and also remember to set the width and height to match parent such that the listview can have the freedom of utilizing the screen size depending on the length of the list defined
<ListView
android:id="@+id/listview1"
android:layout_width="match_parent"
android:layout_height="wrap_content"
tools:ignore="MissingConstraints" />
The full activity_main.xml code is as follows
<?xml version="1.0" encoding="utf-8"?>
<androidx.constraintlayout.widget.ConstraintLayout xmlns:android="http://schemas.android.com/apk/res/android"
xmlns:app="http://schemas.android.com/apk/res-auto"
xmlns:tools="http://schemas.android.com/tools"
android:layout_width="match_parent"
android:layout_height="match_parent"
tools:context=".MainActivity">
<ListView
android:id="@+id/listview1"
android:layout_width="match_parent"
android:layout_height="wrap_content"
tools:ignore="MissingConstraints" />
</androidx.constraintlayout.widget.ConstraintLayout>
- Next, you will need to define a layout file that will hold each item of the list view before it is added to the list view
To do this, right-click on layout, click on new then layout resource file
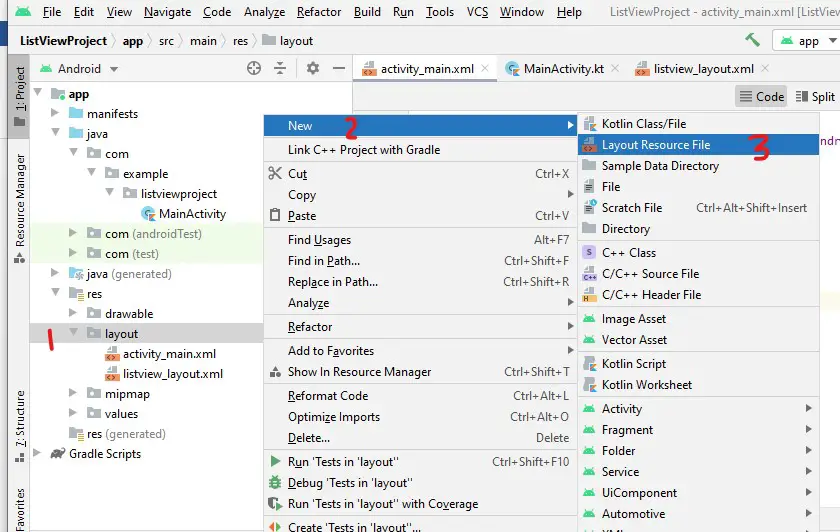
Add a name to the layout file and save, for our case we have used listview_layout.xml
For this example, we are only adding one item to the listview therefore we will define a single text view in the layout XML file. Ensure that the text view has a unique id
The code below is for the layout resource file
<?xml version="1.0" encoding="utf-8"?>
<!-- to display the list in each text view -->
<TextView xmlns:android="http://schemas.android.com/apk/res/android"
android:id="@+id/listviewvalues"
android:layout_width="fill_parent"
android:layout_height="fill_parent"
android:padding="10dp"
android:textSize="15dp"
android:textStyle="bold" >
</TextView>
Ensure that the layout resource file does not have any layout constraints, for example, relative or linear layouts defined. It should be the element alone
- Next, in the MainActivity.kt you will need to define the array list with the items you want to be displayed in a list view. For this article, we are using common car types
var carlist = arrayOf("Nissan", "Toyota", "Audi", "VW", "Benz", "KIA", "Suzuki", "Subaru", "Honda", "Mitsubishi");
- Next, initialize the listview from the activity_main.xml to the MainActivity.kt
val listViewlist = findViewById<ListView>(R.id.listview1)
- Next, initialize the array adapter and add the array items into int
val arrayAdapter = ArrayAdapter<String>(this,
R.layout.listview_layout, carlist)
- Finally, the adapter by merging it with the listview element in the xml file
listViewlist.adapter=arrayAdapter
The full code for MainActivity.kt is as follows
package com.example.listviewproject
import android.annotation.SuppressLint
import androidx.appcompat.app.AppCompatActivity
import android.os.Bundle
import android.widget.ArrayAdapter
import android.widget.ListView
class MainActivity : AppCompatActivity() {
var carlist = arrayOf("Nissan", "Toyota", "Audi", "VW", "Benz", "KIA", "Suzuki", "Subaru", "Honda", "Mitsubishi");
override fun onCreate(savedInstanceState: Bundle?) {
super.onCreate(savedInstanceState)
setContentView(R.layout.activity_main)
val listViewlist = findViewById<ListView>(R.id.listview1)
val arrayAdapter = ArrayAdapter<String>(this,
R.layout.listview_layout, carlist)
listViewlist.adapter=arrayAdapter
}
}
Run your application to the test device and observe the result, the array items will be displayed in a list that is scrollable by default
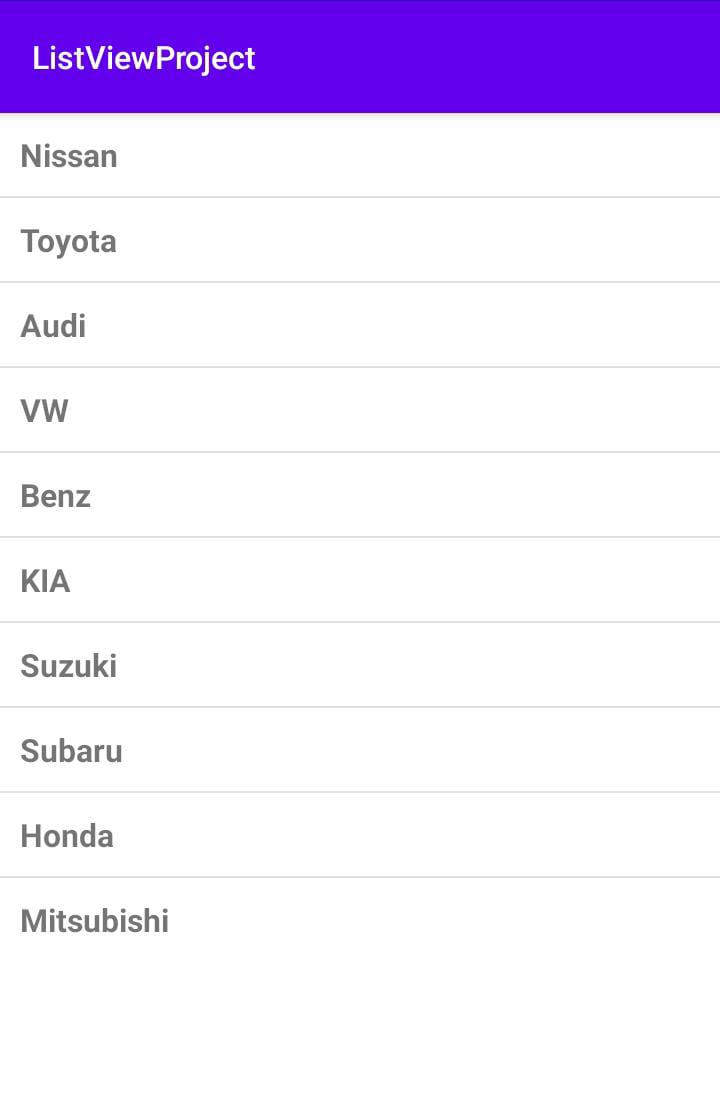
That’s how to create a listview in android using kotlin and adding array items to the listview