
In this article, I will show you have to create a simple register application using kotlin in android studio. The registration app will contain an XML file that will have all the design codes and the kotlin file which will contain the functionality of the app from collecting data to converting the data to a string and checking sure that no blank values will be submitted.
I will begin by creating a new activity, this is assuming that you already have an existing project in android studio, if you are creating a project for the first time use this article and learn how to build an app using kotlin
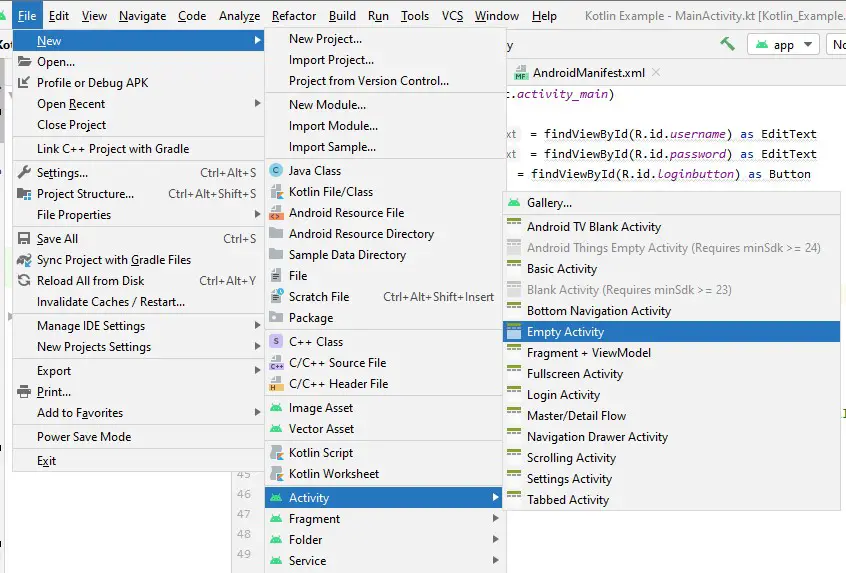
To create a new activity,
- At the top left of android studio, click file, a floating menu will popup, click on file and a new popup menu will appear on its right, scroll down on the new popup menu and select activity, a new popup menu will appear, select empty activity
- A modal will appear where you will configure the activity by providing the details provided. In this case, I will use RegisterActivity as the activity name, leave the others as they are but confirm the language selected is kotlin

- Click finish
- Wait for gradle sync to finish importing all the necessary files
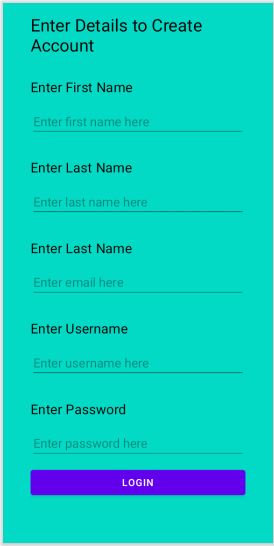
- Once done, I will move to the xml file and create fields that are necessary. In this case I will consider adding first name, last name, email address, username and password. The code for the xml file will be as below
<?xml version="1.0" encoding="utf-8"?>
<androidx.constraintlayout.widget.ConstraintLayout xmlns:android="http://schemas.android.com/apk/res/android"
xmlns:app="http://schemas.android.com/apk/res-auto"
xmlns:tools="http://schemas.android.com/tools"
android:layout_width="match_parent"
android:layout_height="match_parent"
android:background="@color/teal_200"
tools:context=".RegisterActivity">
<LinearLayout
android:layout_width="match_parent"
android:layout_height="match_parent"
android:orientation="vertical"
android:layout_marginLeft="40dp"
android:layout_marginRight="40dp"
android:layout_marginTop="15dp">
<TextView
android:layout_width="wrap_content"
android:layout_height="wrap_content"
android:text="Enter Details to Create Account"
android:textColor="#000"
android:textSize="25dp"
android:id="@+id/textdisplay"
app:layout_constraintBottom_toBottomOf="parent"
app:layout_constraintLeft_toLeftOf="parent"
app:layout_constraintRight_toRightOf="parent"
app:layout_constraintTop_toTopOf="parent" />
<TextView
android:layout_width="match_parent"
android:layout_height="wrap_content"
android:layout_marginTop="30dp"
android:textSize="20dp"
android:textColor="#000"
android:id="@+id/firstnametextview"
android:text="Enter First Name">
</TextView>
<EditText
android:layout_width="match_parent"
android:layout_height="wrap_content"
android:layout_marginTop="15dp"
android:hint="Enter first name here"
android:id="@+id/firstname">
</EditText>
<TextView
android:layout_width="match_parent"
android:layout_height="wrap_content"
android:layout_marginTop="30dp"
android:textSize="20dp"
android:textColor="#000"
android:id="@+id/lastnametextview"
android:text="Enter Last Name">
</TextView>
<EditText
android:layout_width="match_parent"
android:layout_height="wrap_content"
android:layout_marginTop="15dp"
android:hint="Enter last name here"
android:id="@+id/lastname">
</EditText>
<TextView
android:layout_width="match_parent"
android:layout_height="wrap_content"
android:layout_marginTop="30dp"
android:textSize="20dp"
android:textColor="#000"
android:id="@+id/emailtextview"
android:text="Enter Last Name">
</TextView>
<EditText
android:layout_width="match_parent"
android:layout_height="wrap_content"
android:layout_marginTop="15dp"
android:hint="Enter email here"
android:inputType="textEmailAddress"
android:id="@+id/email">
</EditText>
<TextView
android:layout_width="match_parent"
android:layout_height="wrap_content"
android:layout_marginTop="30dp"
android:textSize="20dp"
android:textColor="#000"
android:id="@+id/usernametextview"
android:text="Enter Username">
</TextView>
<EditText
android:layout_width="match_parent"
android:layout_height="wrap_content"
android:layout_marginTop="15dp"
android:hint="Enter username here"
android:id="@+id/username">
</EditText>
<TextView
android:layout_width="match_parent"
android:layout_height="wrap_content"
android:layout_marginTop="30dp"
android:textSize="20dp"
android:textColor="#000"
android:id="@+id/passwordtextview"
android:text="Enter Password">
</TextView>
<EditText
android:layout_width="match_parent"
android:layout_height="wrap_content"
android:layout_marginTop="15dp"
android:inputType="textPassword"
android:hint="Enter password here"
android:id="@+id/password">
</EditText>
<Button
android:layout_width="match_parent"
android:layout_height="wrap_content"
android:layout_marginTop="10dp"
android:id="@+id/registerbutton"
android:text="Create Account">
</Button>
</LinearLayout>
</androidx.constraintlayout.widget.ConstraintLayout>
The above design will produce the screen shown below
Next, we now connect the xml with the kotlin file with the code below
package com.example.kotlinexample
import android.os.Bundle
import android.text.TextUtils.isEmpty
import android.widget.Button
import android.widget.EditText
import android.widget.Toast
import androidx.appcompat.app.AppCompatActivity
class RegisterActivity : AppCompatActivity() {
override fun onCreate(savedInstanceState: Bundle?) {
super.onCreate(savedInstanceState)
setContentView(R.layout.activity_register)
var firstnametext = findViewById(R.id.firstname) as EditText
var lastnametext = findViewById(R.id.lastname) as EditText
var emailtext = findViewById(R.id.email) as EditText
var usernametext = findViewById(R.id.username) as EditText
var passwordtext = findViewById(R.id.password) as EditText
var registerbutton = findViewById(R.id.registerbutton) as Button
// set on-click listener
registerbutton.setOnClickListener {
var firstname = firstnametext.text.toString();
var lastname = lastnametext.text.toString();
var email = emailtext.text.toString();
var username = usernametext.text.toString();
var password = passwordtext.text.toString();
if(isEmpty(firstname) ||isEmpty(lastname) ||isEmpty(email) || isEmpty(username) || isEmpty(password)){
Toast.makeText(this@RegisterActivity, "Please fill all fields", Toast.LENGTH_LONG).show()
}else{
}
}
}
}
The above code will have connected the XML file with the kotlin file and the details will be ready to be sent to the server so that they can be saved to the database using the API.
In this article, we shall not cover data sending and processing through API but you can follow this domain for the next articles that will cover the data processing using API.