In this article, we shall focus on how you can set launcher activity in android studio for your project. The launcher activity is also referred to as the start activity for an app or the first activity for the app.
Every project that is developed in the android studio must have a launcher activity or the start activity or the first activity that launches when the app is opened.
The launcher activity in android for android projects is actually the first screen that opens when you open the app on your mobile device or after you run the app through USB from android studio.
The purpose of the launcher activity in android is to ensure that the user gets the correct sequence of the app from when it is opened, for example,
- in an app that requires login so that the user details can be captured and compared to what is stored in the database is necessary to have the login screen as the first activity before the other activities that have other functionalities
- another example is one that needs to explain the functions of the app using a walkthrough tutorial before the main feature activity is launched, for such an app, the walkthrough is set as the launcher activity before the main screen.
What is an activity in android?
It is important to understand what an activity is in android. An activity in android is basically a single screen that contains all that a user can do at a grasp.
To understand better, we use an example of a login screen and a register screen. A login screen tells the user that the only activity that a user can do on that screen is to add details that are required for login and to register the same.
Therefore, the login screen makes up a single activity and the register screen is another single activity.
The activities that are grouped into one and shown on a single screen make an activity.
In a previous article we discussed how to add a new activity in an existing project in android studio and also we discussed how you can connect activities to each other using intents in android studio
Understanding launcher activity in android
Every project in the android studio must have an activity that is set as the launcher activity. A launcher activity simply means the activity or screen that will be opened first when the app icon is clicked on a mobile device
By default in android studio, the activity that is created first when creating a project is set to be the launcher activity.
When creating a project in the android studio an activity called Main Activity is created by default.
Every activity for a project in the android studio must have two files which are an XML file that contains the designs usually named activity_main.xml and a java or kotlin file depending on the language selected while configuring the project named MainActivity.java for java or MainActivity.kt for kotlin.
The reason why one may wish to set the launcher activity in android to another activity in android is due to the fact that the activities created after the Main Activity are the ones that need to be visible before the default activity.
How to determine the launcher activity
When activities are created in android studio, they are added to the android manifest file inside the tags <activity></activity>
The current launcher activity in android studio for a project in the android manifest file is different from others since it has more additional properties from the others.
The launcher activity has the intent filter properties which sets the activity as the launcher and also specifies the action on the activity as main as shown below
<activity android:name=".MainActivity">
<intent-filter>
<action android:name="android.intent.action.MAIN" />
<category android:name="android.intent.category.LAUNCHER" />
</intent-filter>
</activity>
The intent filter properties with the action main and category launcher set the activity as the launcher and it will be the one that will be opened first once the app is launched
How to set a different launcher activity
In a previous article, we discussed how to change launcher activity in android studio but we saw it worth having this discussion of how to set a launcher activity in case it is missing from a project due to some reasons.
To set a different launcher activity in android studio for a project you will need to follow the steps below
- first, ensure that the project which you want to set the launcher activity is selected or opened in android studio
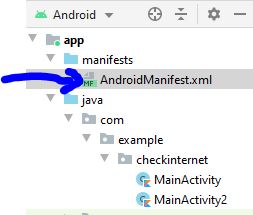
- open the android manifest file which is found below the app then expand the manifests folder in the top left sidebar
- locate the activity you want to set as the launcher activity for your project, for example, in this case I will set Activity2 as the launcher activity
- add this code inside the <activity></activity> tags
<intent-filter>
<action android:name="android.intent.action.MAIN" />
<category android:name="android.intent.category.LAUNCHER" />
</intent-filter>
- the result after adding the code that sets an activity as main, for this case MainActivity2 will be as follows,
<activity android:name=".MainActivity2">
<intent-filter>
<action android:name="android.intent.action.MAIN" />
<category android:name="android.intent.category.LAUNCHER" />
</intent-filter>
</activity>
An important point to note is that there can only be one launcher activity for each project, therefore ensure that the intent filter tags with the action main and category launcher are not added to any other activity as it will bring issues
After setting the launcher activity to another activity, the android manifest file will be as shown below
<?xml version="1.0" encoding="utf-8"?>
<manifest xmlns:android="http://schemas.android.com/apk/res/android"
package="com.example.checkinternet">
<application
android:allowBackup="true"
android:icon="@mipmap/ic_launcher"
android:label="@string/app_name"
android:roundIcon="@mipmap/ic_launcher_round"
android:supportsRtl="true"
android:theme="@style/Theme.CheckInternet">
<!-- activity 2 starts here-->
<activity android:name=".MainActivity2">
<intent-filter>
<action android:name="android.intent.action.MAIN" />
<category android:name="android.intent.category.LAUNCHER" />
</intent-filter>
</activity>
<!-- activity 2 ends here-->
<!-- activity 1 starts here -->
<activity android:name=".MainActivity">
</activity>
</application>
<uses-permission android:name="android.permission.INTERNET" />
<uses-permission android:name="android.permission.ACCESS_NETWORK_STATE" />
</manifest>
When you run your application you will note that the launcher activity will be set to the one you have specified using the above steps.
That’s it for this discussion we have shown the steps that are required to set the launcher activity in android, understood what an activity is in android and also known what a launcher activity is in android.