Tabs in android are becoming relatively useful due to the fact that they use fragments that are added to the main activity without using other activities to define the functions.
The good thing with tabs is that they display at a glance more than one function to the use without navigating to other pages.
In this article, we are continuing from the previous article where we introduced tab view and tab layouts in android and discussed how to create a tabbed project in android .
We proceed on this article by creating fragments, linking fragments to the tabbed activity and showing how to navigate from one tab to another using kotlin
For this discussion, we shall use an example of WhatsApp tabs, that is, Chats, Status and Calls.
To begin adding functionality to the tabbed activity,
- The activity_main.xml code is as we defined in the last article
We have added the highlights color for the active tabs so that they become visible when they are selected
How to change selected Tab Text color using TabLayout from code in Android?
<com.google.android.material.tabs.TabLayout
android:id="@+id/tabs"
android:layout_width="match_parent"
android:layout_height="wrap_content"
app:tabIndicatorColor="@color/white"
app:tabSelectedTextColor="@color/white" // set the highlighted color to the color of your choice
android:background="?attr/colorPrimary" />
</com.google.android.material.appbar.AppBarLayout>
The full activity_main.xml is as below
<?xml version="1.0" encoding="utf-8"?>
<androidx.coordinatorlayout.widget.CoordinatorLayout xmlns:android="http://schemas.android.com/apk/res/android"
xmlns:app="http://schemas.android.com/apk/res-auto"
xmlns:tools="http://schemas.android.com/tools"
android:layout_width="match_parent"
android:layout_height="match_parent"
tools:context=".MainActivity">
<androidx.viewpager.widget.ViewPager
android:id="@+id/view_pager"
android:layout_width="match_parent"
android:layout_height="match_parent"
app:layout_behavior="@string/appbar_scrolling_view_behavior" />
<com.google.android.material.appbar.AppBarLayout
android:layout_width="match_parent"
android:layout_height="wrap_content"
android:theme="@style/Theme.MyApplication1.AppBarOverlay">
<TextView
android:id="@+id/title"
android:layout_width="wrap_content"
android:layout_height="wrap_content"
android:gravity="center"
android:minHeight="?actionBarSize"
android:padding="@dimen/appbar_padding"
android:text="Tab Project"
android:textAppearance="@style/TextAppearance.Widget.AppCompat.Toolbar.Title" />
<com.google.android.material.tabs.TabLayout
android:id="@+id/tabs"
android:layout_width="match_parent"
android:layout_height="wrap_content"
app:tabIndicatorColor="@color/white"
app:tabSelectedTextColor="@color/white"
android:background="?attr/colorPrimary" />
</com.google.android.material.appbar.AppBarLayout>
<com.google.android.material.floatingactionbutton.FloatingActionButton
android:id="@+id/fab"
android:layout_width="wrap_content"
android:layout_height="wrap_content"
android:layout_gravity="bottom|end"
android:layout_margin="@dimen/fab_margin"
app:srcCompat="@android:drawable/ic_dialog_email" />
</androidx.coordinatorlayout.widget.CoordinatorLayout>
- To create the 3 tabs, that is, chats, status and calls you will need to create 3 separate fragments by clicking ui followed by new then select kotlin class or file
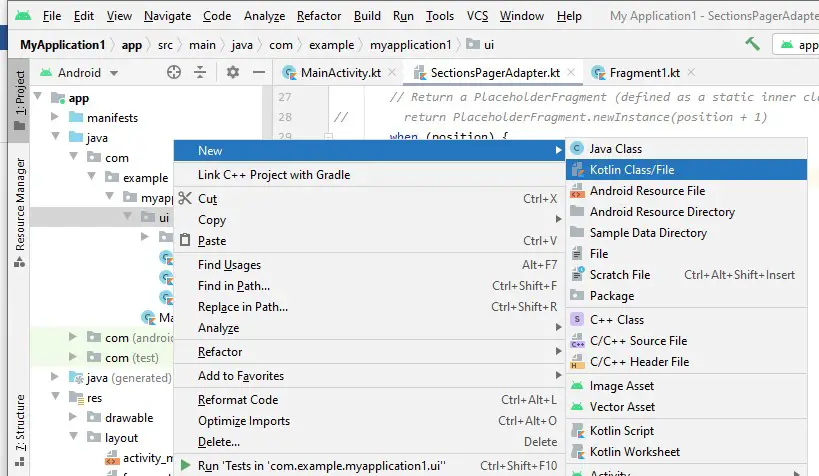
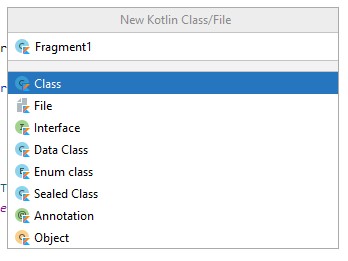
- Add the name of the fragment in the next screen and select class and proceed
- Follow the same procedure until you have created all the fragments you want to be displayed
- You will also need to create layout files for all the fragments you have created above by right-clicking layout then new, finally layout resource file

- Repeat for all the other layout files
In each of the layout file, you add a text so than you will notice the change when you change from one tab to another
For example, the first layout which I have named fragment1 will have the text, chats section as shown below
<?xml version="1.0" encoding="utf-8"?>
<LinearLayout xmlns:android="http://schemas.android.com/apk/res/android"
android:orientation="vertical"
android:gravity="center"
android:layout_width="match_parent"
android:layout_height="match_parent">
<TextView
android:layout_width="wrap_content"
android:layout_height="wrap_content"
android:text="Chats section"
android:textSize="30dp"/>
</LinearLayout>
- To link the layouts file to the fragment classes’ files, in each fragment that you created, you will need to add the respective layout file.
For example, fragment1 xml file you can link it to the fragment1.kt file as shown below
package com.example.myapplication1.ui
import android.os.Bundle
import android.view.LayoutInflater
import android.view.View
import android.view.ViewGroup
import androidx.fragment.app.Fragment
import com.example.myapplication1.R
class Fragment1 : Fragment() {
override fun onCreateView(inflater: LayoutInflater, container: ViewGroup?, savedInstanceState: Bundle?): View? {
return inflater.inflate(R.layout.fragment1,container,false)
}
}
- Do the same to the other fragments
The next step will involve defining the number of tabs titles that you will want to be displayed
- The first step, will involve defining the strings in the strings.xml file and assign name to them as shown below
<resources>
<string name="app_name">Tab Project</string>
<string name="tab_text_1">Chats</string>
<string name="tab_text_2">Status</string>
<string name="tab_text_3">Calls</string>
</resources>
- Next, open the SectionsPagerAdapter.kt found in the ui then main folder
Add the tabs into an array and assign a variable to them
private val TAB_TITLES = arrayOf(
R.string.tab_text_1,
R.string.tab_text_2,
R.string.tab_text_3
)
Then, define what happens when the user navigates from one tab to another
override fun getItem(position: Int): Fragment {
when (position) {
0 -> {
return Fragment1()
}
1 -> {
return Fragment2()
}
2 -> {
return Fragment3()
}
else -> return Fragment1()
}
}
Finally, set the number of tabs or pages that you want displayed, in this case it is 3 (chats, status and calls)
override fun getCount(): Int {
// Show 3 total pages.
return 3
}
The full code for SectionsPagerAdaper.kt is as follows
package com.example.myapplication1.ui.main
import android.content.Context
import androidx.fragment.app.Fragment
import androidx.fragment.app.FragmentManager
import androidx.fragment.app.FragmentPagerAdapter
import com.example.myapplication1.R
import com.example.myapplication1.ui.Fragment1
import com.example.myapplication1.ui.Fragment2
import com.example.myapplication1.ui.Fragment3
private val TAB_TITLES = arrayOf(
R.string.tab_text_1,
R.string.tab_text_2,
R.string.tab_text_3
)
/**
* A [FragmentPagerAdapter] that returns a fragment corresponding to
* one of the sections/tabs/pages.
*/
class SectionsPagerAdapter(private val context: Context, fm: FragmentManager)
: FragmentPagerAdapter(fm) {
override fun getItem(position: Int): Fragment {
when (position) {
0 -> {
return Fragment1()
}
1 -> {
return Fragment2()
}
2 -> {
return Fragment3()
}
else -> return Fragment1()
}
}
override fun getPageTitle(position: Int): CharSequence? {
return context.resources.getString(TAB_TITLES[position])
}
override fun getCount(): Int {
// Show 3 total pages.
return 3
}
}
That’s how you will be through in creating 3 tabs and defining what happens when you navigate to each tab
Run your application and the result will be as shown below

Hope you have enjoyed creating tabs in android using kotlin