We shall create a simple login screen in android studio using XML and connect it with a java file. To create a simple login screen we shall need some elements that we are going to apply in android studio. To start, open android studio and set up your project, for assistance, refer to our previous tutorials on how to create your first android application.
In the XML file named activity_main.xml we shall add an image view, two text views, two edit texts, and a button.
An Image view acts as a placeholder for images, we shall use it to display a logo that identifies the project to its name.
A text view displays text to the user in this case it will display username and password fields, in other words it acts a s a label
An Edit text is used to retrieve text data from user in that it acts as a form field where you can add your information as requested
To add image view in xml file add the following
<ImageView
    android:layout_width="wrap_content"
    android:layout_height="wrap_content"
    android:layout_marginLeft="150dp"
    android:layout_marginTop="50dp"
    android:id="@+id/imagelogo"
    android:src="@mipmap/ic_launcher"
    />
You should update the src with your image name, but first you should add the image inside the project folder for it to appear
To add username text view and edit text use the following
<TextView
    android:layout_width="match_parent"
    android:layout_height="wrap_content"
    android:text="Username"
    android:layout_below="@+id/imagelogo"
    android:textSize="40dp"
    android:layout_marginTop="50dp"
    android:id="@+id/usernameview"
     />
<EditText
    android:layout_width="match_parent"
    android:layout_height="wrap_content"
    android:layout_below="@+id/usernameview"
    android:id="@+id/username"
    />
The must-haves in the above code are
- The layout_width
- The layout_height
- The id
To add password text view and edit text use the following
<TextView
    android:layout_width="match_parent"
    android:layout_height="wrap_content"
    android:text="Password"
    android:layout_below="@+id/username"
    android:textSize="40dp"
    android:layout_marginTop="20dp"
    android:id="@+id/passwordview"
    />
<EditText
    android:layout_width="match_parent"
    android:layout_height="wrap_content"
    android:layout_below="@+id/passwordview"
    android:id="@+id/password"
    android:inputType="textPassword"
    />
Next will be adding the submit button
<Button
    android:layout_width="300dp"
    android:layout_height="80dp"
    android:text="Login"
    android:id="@+id/login"
    android:layout_marginLeft="50dp"
    android:layout_below="@+id/password"
    />
The full activity_main.xml code will be
<?xml version="1.0" encoding="utf-8"?>
<RelativeLayout
xmlns:android="http://schemas.android.com/apk/res/android"
android:layout_width="match_parent"
android:layout_height="match_parent"
xmlns:tools="http://schemas.android.com/tools"
android:background="#9cc2e5"
tools:context=".MainActivity">
<ImageView
android:layout_width="wrap_content"
android:layout_height="wrap_content"
android:layout_marginLeft="150dp"
android:layout_marginTop="50dp"
android:id="@+id/imagelogo"
android:src="@mipmap/ic_launcher"
/>
<TextView
android:layout_width="match_parent"
android:layout_height="wrap_content"
android:text="Username"
android:layout_below="@+id/imagelogo"
android:textSize="40dp"
android:layout_marginTop="50dp"
android:id="@+id/usernameview"
/>
<EditText
android:layout_width="match_parent"
android:layout_height="wrap_content"
android:layout_below="@+id/usernameview"
android:id="@+id/username"
/>
<TextView
android:layout_width="match_parent"
android:layout_height="wrap_content"
android:text="Password"
android:layout_below="@+id/username"
android:textSize="40dp"
android:layout_marginTop="20dp"
android:id="@+id/passwordview"
/>
<EditText
android:layout_width="match_parent"
android:layout_height="wrap_content"
android:layout_below="@+id/passwordview"
android:id="@+id/password"
android:inputType="textPassword"
/>
<Button
android:layout_width="300dp"
android:layout_height="80dp"
android:text="Login"
android:id="@+id/login"
android:layout_marginLeft="50dp"
android:layout_below="@+id/password"
/>
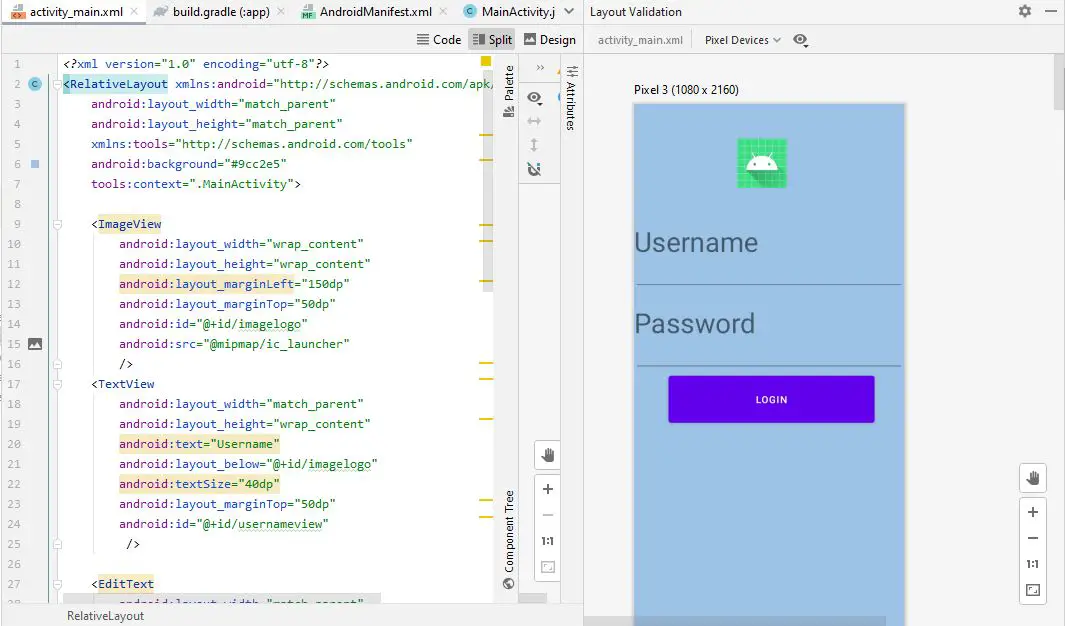
</RelativeLayout>The output screen for the above code is as below
Next, we shall connect the ids in activity_main.xml to MainActivity.java and the code will be as shown
Initialize the Edit texts and button in the public class as shown
EditText username,password;
Button login;
Next, connect the above initialized elements to the one in the xml file as below inside the onCreate method
username=(EditText)findViewById(R.id.username);
password=(EditText)findViewById(R.id.password);
login=(Button) findViewById(R.id.login);
Next, we add the click action to the login button and check whether the user has entered data in the username and password fields. If there are blanks, display text messages to the user asking for information, if all are filled correctly the login activity will proceed
login.setOnClickListener(new View.OnClickListener() {
    @Override
    public void onClick(View view) {
        if(username.getText().toString().equals("")){
            Toast.makeText(getApplicationContext(), "Username cannot be blank", Toast.LENGTH_SHORT).show();
        }else if(password.getText().toString().equals("")){
            Toast.makeText(getApplicationContext(), "password cannot be blank", Toast.LENGTH_SHORT).show();
        }else{
            Toast.makeText(getApplicationContext(), "login method to proceed", Toast.LENGTH_SHORT).show();
        }
    }
});
So far, the MainActivity.java full code is as below
package com.example.solutionspaceapp;
import androidx.appcompat.app.AppCompatActivity;
import android.content.Context;
import android.os.Bundle;
import android.net.ConnectivityManager;
import android.net.NetworkInfo;
import android.os.Bundle;
import android.view.View;
import android.widget.Button;
import android.widget.EditText;
import android.widget.Toast;
public class MainActivity extends AppCompatActivity {
    EditText username,password;
    Button login;
    @Override
    protected void onCreate(Bundle savedInstanceState) {
        super.onCreate(savedInstanceState);
        setContentView(R.layout.activity_main);
        username=(EditText)findViewById(R.id.username);
        password=(EditText)findViewById(R.id.password);
        login=(Button) findViewById(R.id.login);
        login.setOnClickListener(new View.OnClickListener() {
            @Override
            public void onClick(View view) {
                if(username.getText().toString().equals("")){
                    Toast.makeText(getApplicationContext(), "Username cannot be blank", Toast.LENGTH_SHORT).show();
                }else if(password.getText().toString().equals("")){
                    Toast.makeText(getApplicationContext(), "password cannot be blank", Toast.LENGTH_SHORT).show();
                }else{
                    Toast.makeText(getApplicationContext(), "login method to proceed", Toast.LENGTH_SHORT).show();
                }
            }
        });
    }
    }
For this article, we shall pause at that step so that in the next article we discuss how to add the Login API which will communicate with the server to check whether the information added by the user exists in the database table.