A navigation bar be it either in web development or android development plays a vital role since it gives the user an easier path to move from one activity or page to another.
A navigation bar should be visible always and if not, there should be a visible marker to show where the navigation is. In mobile devices, the navigation bar is always represented by 3 vertical lines either in the top left or right of the application.
The navigation bar mostly in android development has been created as a navigation drawer in which you have to click the 3 vertical lines in the top left of the application so that the navigation can appear.
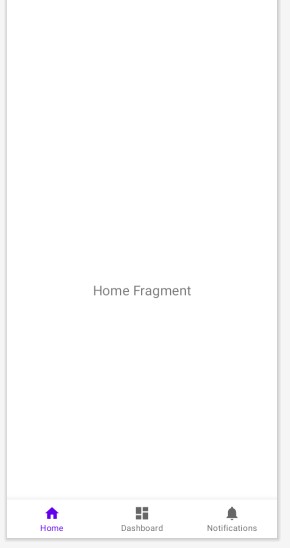
As the technology has been advancing, android decided to include a navigation bar that can be placed at the bottom of the screen application which is always floating and enables the users to have easier access to other pages or files in the application
The bottom navigation plays an important role as a new user will be provided with a one-time view of all the main activities or functions of the application
To create a bottom navigation bar in android, you do not have to follow the ambiguous steps like before to achieve this functionality. It has been made easier and simpler in the android studio
How to create a bottom navigation bar in android
First, you will need to create a project with bottom navigation, remember while we have been creating other projects, we have been selecting empty activity as the feature to work with
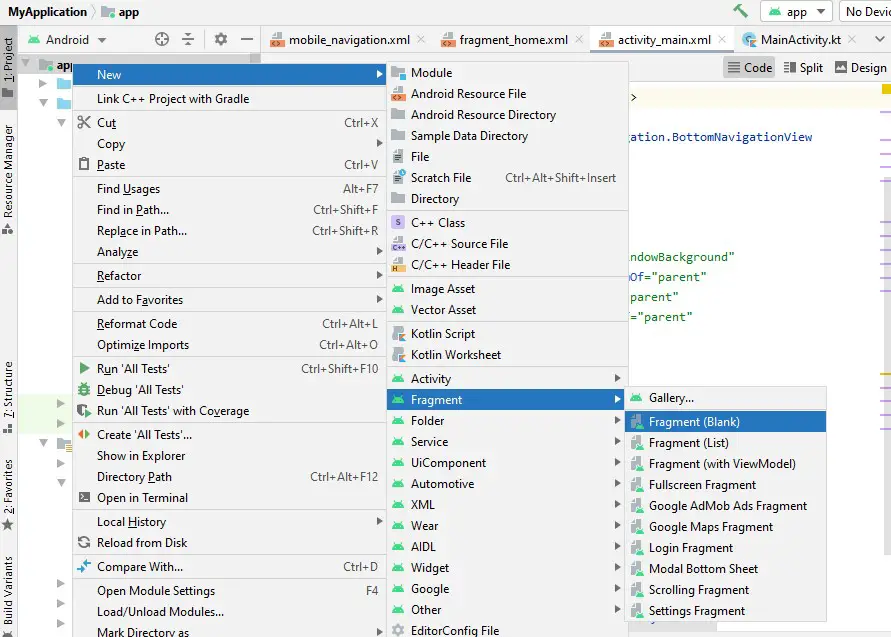
To create a new project
- Click file, select new then new project

- In the modal that appears, select bottom navigation activity

- Click next and configure your project in the next screen that appears, that is, give your project a name and leave the other fields as they are
- Click finish
- Wait for the resources to be imported and might take some time since the resources used in the bottom navigation bar must be downloaded if you are using this feature for the first time
- Once done all will be set
Explaining the features of the bottom navigation bar in android
The number of files that will be created under this feature will be many as compared to the normal empty activity
- The app build Gradle
You will notice that a lot of dependencies will be added to this file
Check out below to ensure you have all this in the build.gradle(app)
dependencies {
implementation "org.jetbrains.kotlin:kotlin-stdlib:$kotlin_version"
implementation 'androidx.core:core-ktx:1.7.0'
implementation 'androidx.appcompat:appcompat:1.3.1'
implementation 'com.google.android.material:material:1.4.0'
implementation 'androidx.constraintlayout:constraintlayout:2.1.1'
implementation 'androidx.navigation:navigation-fragment:2.3.5'
implementation 'androidx.navigation:navigation-ui:2.3.5'
implementation 'androidx.lifecycle:lifecycle-livedata-ktx:2.3.1'
implementation 'androidx.lifecycle:lifecycle-viewmodel-ktx:2.3.1'
implementation 'androidx.navigation:navigation-fragment-ktx:2.3.5'
implementation 'androidx.navigation:navigation-ui-ktx:2.3.5'
testImplementation 'junit:junit:4.+'
androidTestImplementation 'androidx.test.ext:junit:1.1.3'
androidTestImplementation 'androidx.test.espresso:espresso-core:3.4.0'
}
The navigation dependencies are as a result of bottom navigation bar
- activity_main.xml file
This file by default in bottom navigation is the one that contains the bottom navigation view
You will notice that while working with the items that are in the navigation bar, we will be using fragments other than activities. All the items defined in the bottom navigation bar will be fragments and then linked to the activity file
The activity_main.xml code will be as below
<?xml version="1.0" encoding="utf-8"?>
<androidx.constraintlayout.widget.ConstraintLayout xmlns:android="http://schemas.android.com/apk/res/android"
xmlns:app="http://schemas.android.com/apk/res-auto"
android:id="@+id/container"
android:layout_width="match_parent"
android:layout_height="match_parent"
android:paddingTop="?attr/actionBarSize">
<com.google.android.material.bottomnavigation.BottomNavigationView
android:id="@+id/nav_view"
android:layout_width="0dp"
android:layout_height="wrap_content"
android:layout_marginEnd="0dp"
android:layout_marginStart="0dp"
android:background="?android:attr/windowBackground"
app:layout_constraintBottom_toBottomOf="parent"
app:layout_constraintLeft_toLeftOf="parent"
app:layout_constraintRight_toRightOf="parent"
app:menu="@menu/bottom_nav_menu" />
<fragment
android:id="@+id/nav_host_fragment"
android:name="androidx.navigation.fragment.NavHostFragment"
android:layout_width="match_parent"
android:layout_height="match_parent"
app:defaultNavHost="true"
app:layout_constraintBottom_toTopOf="@id/nav_view"
app:layout_constraintLeft_toLeftOf="parent"
app:layout_constraintRight_toRightOf="parent"
app:layout_constraintTop_toTopOf="parent"
app:navGraph="@navigation/mobile_navigation" />
</androidx.constraintlayout.widget.ConstraintLayout>
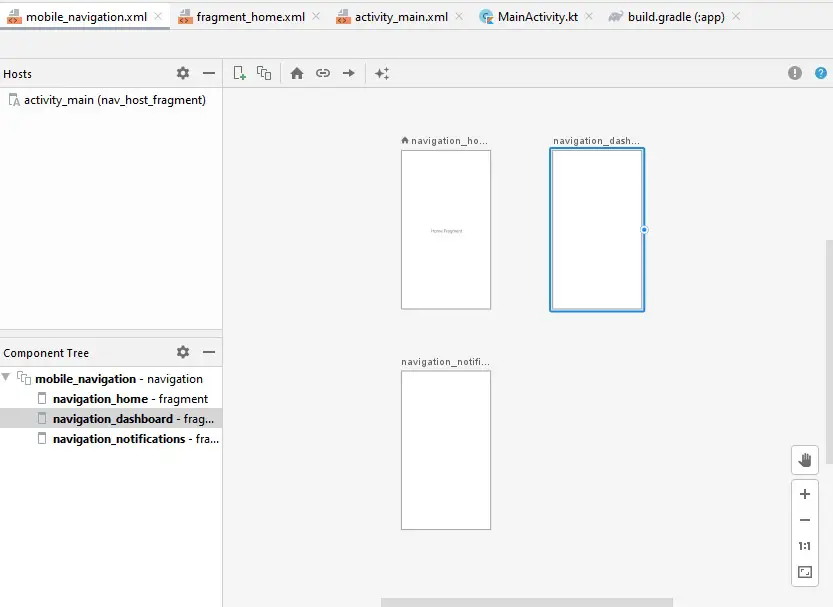
- Fragments
By default, the bottom navigation bar activity creates three fragments as shown below
You can add others as you wish by clicking app, then fragment then, fragment blank
To add designs or codes in the fragments, navigate the mobile_navigation.xml file created and it will have the current fragments that are there
Click on any fragment you want to edit
To add functionality to the fragments, navigate to the ui folder created inside the application folder and navigate to each fragment
- MainActivity.kt
Once done, you will need to navigate to the main activity file. This is where you initialize the fragments and set which fragment will be displayed first and also what happens when an icon is clicked at the bottom navigation bar
To initialize the fragments in the main activity, call each fragment and assign a value
val DashboardFragment=DashboardFragment()
val HomeFragment=HomeFragment()
val NotificationsFragment=NotificationsFragment()
To set which fragment will be visible when the app is launched, use this code
setCurrentFragment(DashboardFragment) //added inside the onCreate method
//added outside the onCreate method
private fun setCurrentFragment(fragment: Fragment)=
supportFragmentManager.beginTransaction().apply {
commit()
}
To set what happens when each navigation item is clicked, the code below shows that
navView.setOnNavigationItemSelectedListener {
when(it.itemId){
R.id.navigation_home->setCurrentFragment(HomeFragment)
R.id.navigation_dashboard->setCurrentFragment(HomeFragment)
R.id.navigation_notifications->setCurrentFragment(NotificationsFragment)
}
true
}
The full code for main activity in kotlin is as follows
package com.example.myapplication
import android.os.Bundle
import com.google.android.material.bottomnavigation.BottomNavigationView
import androidx.appcompat.app.AppCompatActivity
import androidx.fragment.app.Fragment
import androidx.navigation.findNavController
import androidx.navigation.ui.AppBarConfiguration
import androidx.navigation.ui.setupActionBarWithNavController
import androidx.navigation.ui.setupWithNavController
import com.example.myapplication.ui.dashboard.DashboardFragment
import com.example.myapplication.ui.home.HomeFragment
import com.example.myapplication.ui.notifications.NotificationsFragment
class MainActivity : AppCompatActivity() {
override fun onCreate(savedInstanceState: Bundle?) {
super.onCreate(savedInstanceState)
setContentView(R.layout.activity_main)
val navView: BottomNavigationView = findViewById(R.id.nav_view)
val navController = findNavController(R.id.nav_host_fragment)
// Passing each menu ID as a set of Ids because each
// menu should be considered as top level destinations.
val appBarConfiguration = AppBarConfiguration(setOf(
R.id.navigation_home, R.id.navigation_dashboard, R.id.navigation_notifications))
setupActionBarWithNavController(navController, appBarConfiguration)
navView.setupWithNavController(navController)
val DashboardFragment=DashboardFragment()
val HomeFragment=HomeFragment()
val NotificationsFragment=NotificationsFragment()
setCurrentFragment(DashboardFragment)
navView.setOnNavigationItemSelectedListener {
when(it.itemId){
R.id.navigation_home->setCurrentFragment(HomeFragment)
R.id.navigation_dashboard->setCurrentFragment(HomeFragment)
R.id.navigation_notifications->setCurrentFragment(NotificationsFragment)
}
true
}
}
private fun setCurrentFragment(fragment: Fragment)=
supportFragmentManager.beginTransaction().apply {
commit()
}
}
Run your application and observe the behavior of the bottom navigation bar